

Dec 12, 2011 - updated Nov 25, 2023
following notes are based on doing this for very many years.
HOW BIG?
A general rule of thumb is 1½ pounds per guest. So for 8 people a 12 pound turkey will work. To that rule, add an extra pound or two to guarantee plenty of yummy letovers.
HOW LONG?
Depends on size, cooking temperature and whether you use a conventional oven or a convection oven. My rule of thumb is 15 minutes per pound for "conventional" and 12 minutes per pound for "convection" .... at 325 degrees.
FROZEN vs FRESH
I have done it both ways and prefer frozen...here's why. There is really no way for you to determine if a turkey labeled "fresh" is really "fresh". That being said, lots of tasters said that they simply prefered the taste of the fresh turkeys. So a few years ago, Cooks Illustrated magazine
(considered an authority in all things relating to cooking) did a test with their own staff and
consistently found the frozen birds to be moister than the fresh. They explained that a "fresh" bird can actually be tougher and drier than a frozen one.
Turkeys may be labeled as "fresh" if they have been chilled to as low as 26 degrees. But at this temperature, tiny ice crystals can form in the meat. If the temperature fluctuates (during storage or transport, at the supermarket, or on the way to your home), these crystals can melt, combine with neighboring crystals, and then refreeze. According to Cooks Illustrated, "Eventually, irregularly shaped ice crystals will start to poke the cell membranes in the meat. They make holes and the cell tissues in the muscles will start to lose their internal contents. Then when they are cooked, those birds will be dry."
Also, a frozen turkey is about 50-60% less expensive then its fresh counterpart!
CONVENTIONAL OVEN vs CONVECTION OVEN
If you have a convection oven, cosider using it. The turkey will cook faster and you are virtually assured of a crispy skin, even without basting. In fact, many authorities say that pre-basting or brining is not necessary at all when using a convection oven. SInce the turkey cooks faster, tin foil covering portions of the skin is not required.
THE BRINE (WET vs DRY)
WET - he theory of wet brining is that the salt/sugar mixture alters proteins in the turkey meat making it easier to retain moisture, and through the principles of absorbsion the turkey meat will retain some of the flavors from the brine.
- Several bags of ice.
- 2 parts SUGAR to 1 part MORTONS KOSHER SALT, or, more precisely: For each quart of water add 1/4 cup +2 tbsp
MORTON KOSHER and 1/2 cup sugar.
- CHILL THE BRINE MIXTURE WITH ICE PRIOR TO ADDING THE TURKEY!
- Place thawed turkey in a medium size plastic garbage bag and pour the chilled brine mixure over it. Squeeze as much air out of the bag as possible and seal it.
- Place in a large ice chest and cover with the ice. This should be done Wednesday late afternoon (24 hours is too long; do it over night.)
- On Thursday morning (early) remove the turkey and rinse well with fresh water to remove any sugar particles. Pat dry with towel.
- Allow turkey to "air-dry" in refigerator for remainder of the morning. ( AIR DRYING THIS WAY WILL HELP ENSURE AN EXTREMELY CRISP SKIN).
PROS & CONS
- The obvious pro is that you are "assisting" the turkey meat to reach its full flavor potential..think moist and flavorful. But to guarantee a crispy, golden skin, the turkey skin must be as dry as possible. Wet brining makes it difficult to completely dry out the bird before cooking. So if your more interested in a crispy, golden crust, you switch to a "dry-rub" instead of a wet brine. Using this method instead of placing the bird in the brine solution Wednesday night, you instead dry it out completely with paper towels, then rub your dry spices onto the skin and let air dry overnight in the refrigerator. This bird weill be very dry and ready for the oven Thursday.
DRY RUB
Has certainly gained popularity in the last few years.....use whatever you think will complement your taste. A mixture of peppercorns, fresh rosemary, thyme, bay leaves, smoked paprika, lemon zest - the options are limitless. Spread it over the bird Wed as it goes into the refer for the overnight drying.
BAKING POWDER
In recent years many cooking institutions have suggested that adding a small amount of baking powder to the dry rub further helps to ensure a picture-perfect crispy skin. Mixing the baking powder with your dry brine can help draw out excess moisture in the skin. The baking powder increases the skin's pH levels, breaking down the proteins more efficiently, creating tender, juicy meat and an even browning of the skin. At the same time, the baking powder also reacts with the turkey's natural water molecules creating tiny carbon dioxide bubbles. This reaction slowly increases the skin's surface area and results in a crunchier texture and crispier skin when cooked. How to do it? Combine six tsp kosher salt with two tsp baking powder (for me, thats all I do), however YOU may wish to augment that with pepper, garlic flakes, or any other favorite herbs and spices. Sprinklle it over the exposed skin. Do this Wednesday PM before the bird goes into the refer for overnight drying.
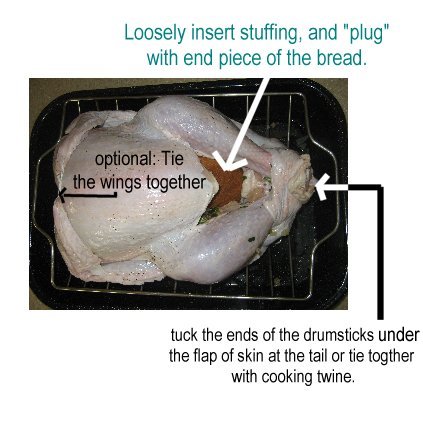
STUFFING
In the old days, we would put all, or a portion of our stuffing, inside the cavity of the turkey to cook. This, did indeed, impart a super rich flavor to the stuffing. However since we are now terminating the cooking process earlier then we did in those days, the chance of salmonella encroachment is strong. Therefore its best to keep the stuffing away from the turkey and let them meet together on the dinner plate.
BASTING???
Many older recipes call for basting; before and during the cooking process. This is not necessary or recommended. The brine or dry rub is sufficient for imparting the extra flavor. Opening the oven repeatedly to baste will upset the cooking process and go towards creating a "soggy" vice a "crispy" skin.

1. THAW THE TURKEY
Remove frozen turkey from freezer on Saturday prior to Thanksgiving. Let it thaw in the refrigerator in its original plastic covering.
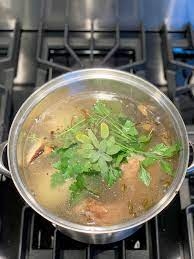
2. STOCK (for use in making gravy later)
NOTE: Giblets will be in 2 packages in 2 separate parts of Turkey cavity!
- Giblets
- 1/2 onion
- 1 celery
- 1 carrot
- 2 cloves
- a few sprigs parsely
- 1 bay leaf
Put giblets (neck, heart, etc but NOT liver) in pot with 4 cups water (or even better, use low sodium chicken stock),celery and carrot cut in half or thirds, parsely, bay leaf and cut onion...bring to boil,
reduce heat to low, cover and simmer for no more than 2 hours.
Strain the stock. Chop giblets into very small pieces and set aside.Remove the neck meat with your fingers, chop, and add to giblets.
If done ahead, the stock and giblets can be refrigerated at this point in separate containers.
WE WILL USE THE CHOPPED GIBLETS AND STOCK FOR LATER USE IN MAKING THE GRAVY!
3. PREPARE STUFFING
(Use your own recipe, or try my Grandmother's here:)
NOTE: this makes stuffing for about 10. If less people, cut back on all ingredients proportionately!
Do this first step with the bread the day before and let it sit out on the counter to dry out as much as possible...dry bread will better absorb the ingredient's flavor!
- 1 small loaf of bread (or 2/3'rd's of a large loaf) with the crusts cut-off (your choice..I use simple sandwich bread or sourdough..try to avoid heavier, multi-grain varieties) Tear the bread up into SMALL PIECES, not cut! Save one end piece (see picture below).
- 4 stalks celery , chopped
- 1 cup chopped parsely
- 3 tbs poultry seasoning
- pinch of sage
- Salt/pepper to taste
- 1/2 cup stock give or take
- In a small fry pan, cook 1 chopped onion in a bit of olive oil..remove from pan. Then, in same pan:
- Cook 3/4 lb "Italian Sweet" sausage. Once done, drain and chop it very finely.
Combine all ingredients except the stock in a buttered casserole dish and Mix Well! Then slowly add the stock - but not too much... we don't want it "soggy".
Place in a casserole dish, cover and cook for 30 minutes at 325-350 degrees.
HINT: You can prepare the stuffing well ahead of time..just don't add the cooked onions, sausage and broth until you are ready to put it in oven.
4. PREP TURKEY
Refer to notes on "Dry vs Wet" (rubs/brining) above. For my last Thanksgiving turkey I used the convection oven and a 3:1 (Kosher Salt:Baking Powder) rub the night before and nothing else. The results were as good as anything I've done in the past. Remove from refrigerator 1½ - 2 hours prior to cooking. Place in roasting pan as shown and tuck the ends of the drumsticks under the loose flap of skin (depicted) or tie together loosely with string. If you choose to baste, nows the time to do it. Let the turkey slowly come up to room temperature which is essential to ensure even cooking throughout.
5. COOK TURKEY.
IF USING CONVENTIONAL OVEN: Pre heat oven to 500 degrees. IF USING CONVECTION OVEN: Pre heat oven to 350 degrees.
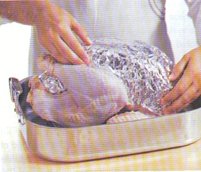
(CONVENTIONAL OVEN only) Cover turkey breast tightly with HEAVY DUTY foil ( SHINY SIDE UP). and cover Drumsticks also.
Although not necessary, placing the turkey sitting on a rack will allow air to circulate underneath the bird, ensuring even roasting all around.
(CONVENTIONAL and CONVECTION) Reduce oven to 325 degrees (use 350 degrees if the bird is over 20 pounds). as you insert the turkey - the initial higher temperature helps the fat under the skin heat quickley and saute the skin from below.
Remove Drumstick foil after 30 minutes in oven and remove breast foil after 1 - 2 hours (this technique prevents those portions from browing too quickly)
Roast turkey in a 325 F oven, depending on size,. for approx 2-4 hours (less for Convection).
After 2 hours, cut band of skin or string tied between the drumsticks so thighs will cook evenly.
Just because my oven will perfectly cook the turkey in 2 1/2 hours, yours may do it quicker...or take longer: so approaching 2 hours (less in a convection oven), check the temperature with a thermometer.
 165 degrees is the magic number for coolest part of the bird - salmonella is killed at 165; if bird is pulled
from oven at 165 or a few degrees before, it will continue to cook another 4-5 degrees from residual heat as it rests. This method should produce the ideal temperature
for a truly moist turkey of 165 degrees at the thickest part of the breast and perhaps 170 degrees at the thigh.
165 degrees is the magic number for coolest part of the bird - salmonella is killed at 165; if bird is pulled
from oven at 165 or a few degrees before, it will continue to cook another 4-5 degrees from residual heat as it rests. This method should produce the ideal temperature
for a truly moist turkey of 165 degrees at the thickest part of the breast and perhaps 170 degrees at the thigh.
Let turkey rest for 30-45 minutes before carving. COMPLETELY COVER TURKEY IN TIN FOIL AS ITS RESTING!
6. GRAVY
In recent years I've found that you can buy excellent quality gravy (think COSTCO) which cuts down on your work load. By all means, add the chopped giblets from "Making the Stock" and even some of the pan drippings, to the store bought gravy; I even finish it with up to 1/4 cup heavy creme to add the "home made" jive.
But if you want the real McCoy, try my Moms recipe:
Once the turkey has been removed from the oven, transfer it to a cutting board and cover with tin foil. Add a small amount of stock to the hot roasting pan (no more than 1/3 cup) and strlir up all the juices and brown bits and leave in pan for the time being. In a separate pan make a roux with 6 tbs flour and 6 tbs butter over medium heat
(6 tbs butter/flour for 6+ people - increase for 1 tbs per person for more than 6, or if you want left-over gravy) then slowly add the stock you made previously along with all the chopped the giblets (above) followed by the pan drippings
until you get the desired volume/consistency and simmer for 10 minutes. Its a good idea to have some store bought broth on hand in case you need it to augment.
NOTE: Ensure any liquid you add to the initial "roux", including canned chicken broth, is HOT...this will help avoid a "lumpy" gravy.
NOTE: The gravy should appear "thin".... it will thicken as it cools a bit and sitsl.
Optional: add up to 1/4 cup heavy creme to "finish" the gravy into a "sauce". NOT TOO MUCH OR THE SAUCE
WILL TURN FROM A GOLDEN BROWN COLOR TO A CREME COLOR!!!!
NOTE: Don't let the gravy cool too much; it can simmer on the stove until ready to serve..pre-heat your gravy bowl with hot water for a few minutes before serving.
7. ADDENDUM.
A wonderful stock can be made from some of the leftovers. After dinner place the turkey carcass and any loose bits of meat into a large pot with lots of water.(maybe 4 quarts- eough to partially submerge most of the ingredients). Add several chopped carrots and celery and onion; a bay leaf or two, salt & pepper I put heavy tin foil over top to seal and on top of that put a cookie sheet. Bring initially to a boil, then immediately reduce the burner heat to the LOWEST POSSIBLE setting. Turn on overhead stove fan and let simmer all night. Transfer the liquid to another container and when it has cooled and after 30 minutes skim off any fat that rises to the top. I pour the stock into muffin tins, freeze, and later remove to freezer baggies or tupperware. Then I always have on hand a "cup" of great turkey broth whenever I need it!
8. GLUTEN FREE SUGGESTIONS.
Its easy to make your Thanksgiving feast gluten free. Start by using GF flour to make the roux (step 8 above). For the stuffing (step 4 above) simply ensure that you use GF sausage (its usually the casing that has the wheat products) and GF bread, or substitute the same amount of bread with broken up cornbread muffins.